
Kimchi (김치) makes happy.
There are as many different ways of preparing kimchi as there are families in Korea. So there is no such thing as the one, true, authentic kimchi. I learned the way to make kimchi from Bok-Soon, a friend from Korea, in March 2019. We spent a great afternoon making kimchi, rice and bulgogi, talking a lot, eating and drinking together.
I consider myself very fortunate to have been able to watch Bok-Soon make kimchi and ask so many questions. Along the way, I learned many interesting details about ingredients, seasons, traditions and making the different types of kimchi.
The best place to get traditional kimchi is at a Korean restaurant or grocery store. Many Korean-run grocery stores offer fresh, homemade kimchi. If you don't have a source near you, homemade kimchi certainly tastes better and is definitely fresher than canned kimchi.
INGREDIENTS
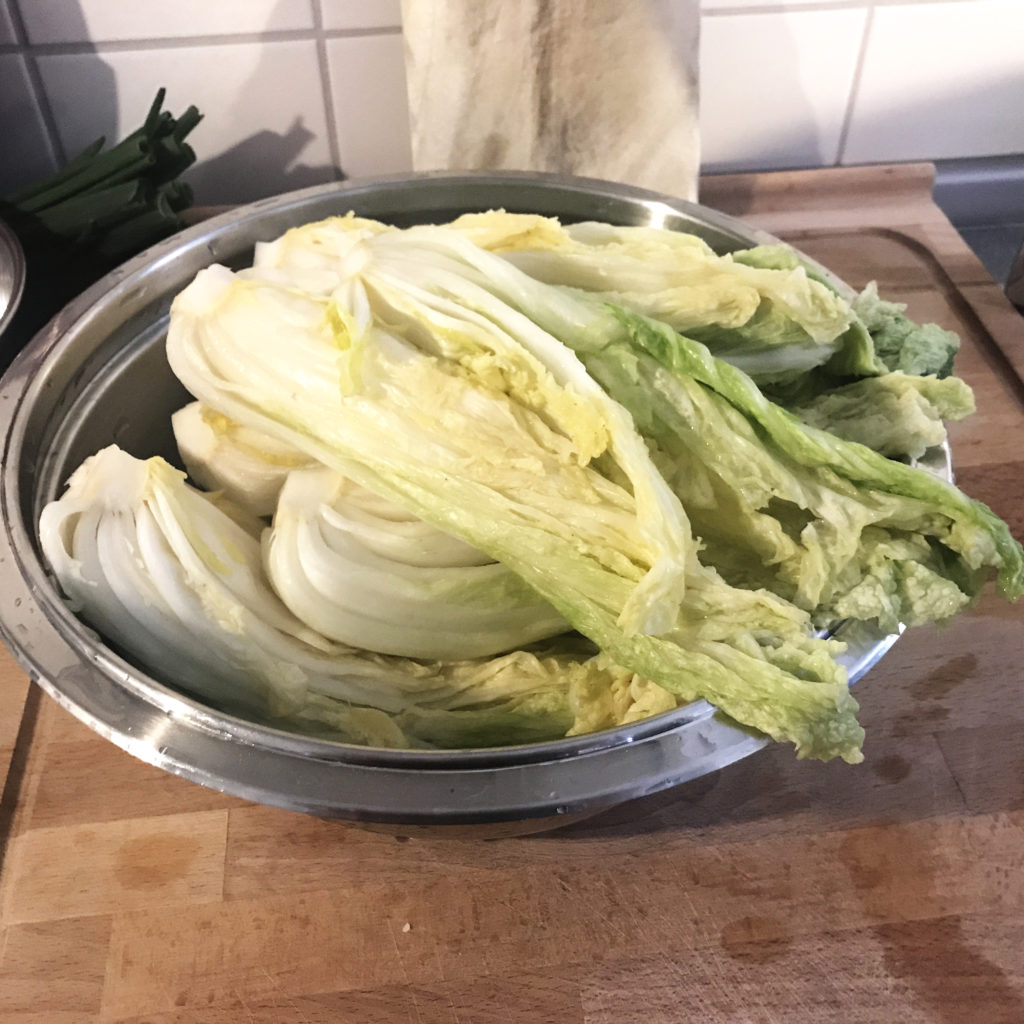
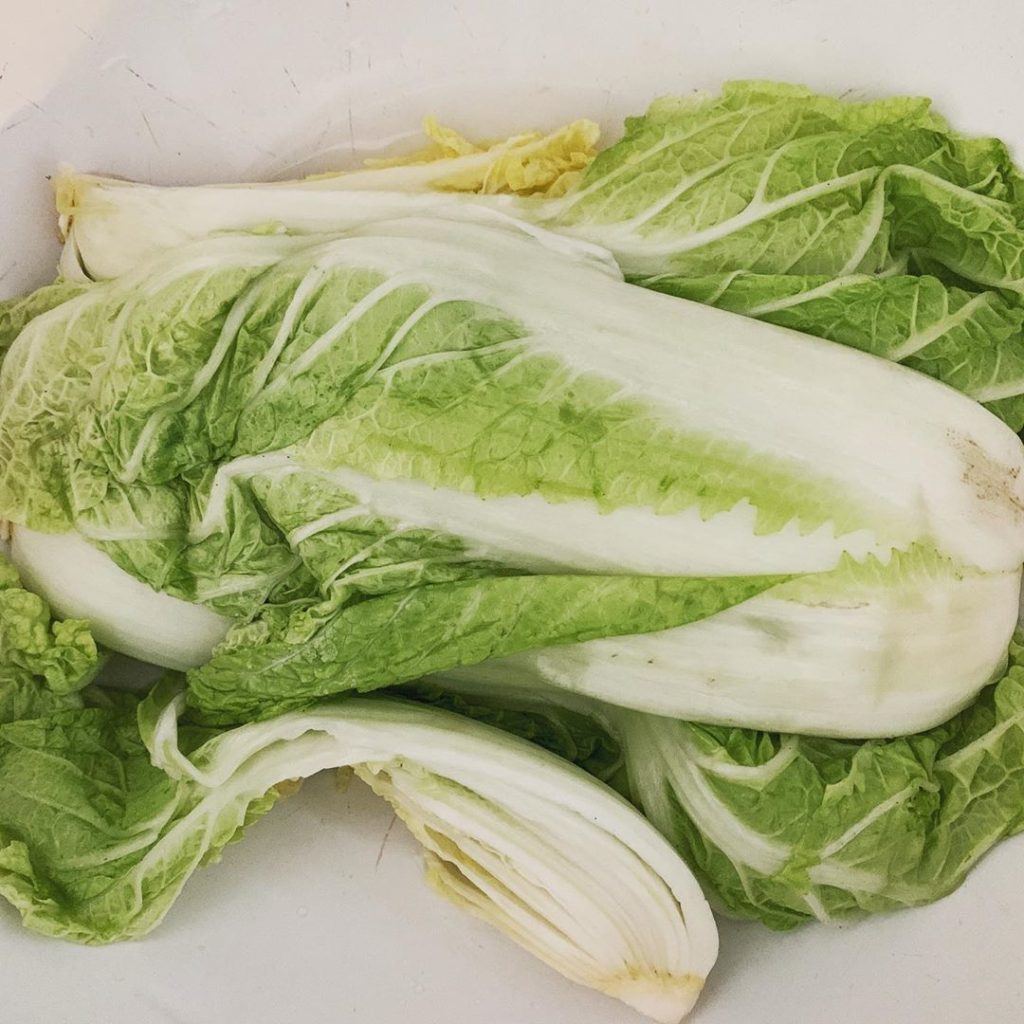
- 1 smaller napa cabbage
- 1 handful of salt
- 3 garlic cloves
- 1 pc. of ginger
- ½ hand full cooked rice
- 1 small white onion
- 1 fresh red chilli
- 1 tbsp. sugar
- 3 tbsp gochugaru (Korean chili powder 고추가루) **
- ½ leek
- 1 tbsp. fish sauce *
- 6 tbsp. water
- 1 small carrot *
* optional
** Gochugaru, finely ground Korean chili flakes, are slightly sweet and taste best. But you can replace them with any other kind of chili flakes or even cayenne pepper, I learned. You can leave out the fish sauce and your kimchi will be vegan. Bok-Soon doesn't use fish sauce in her kimchi, I love the spicy flavor - your preference decides.
PREPARATION
Cut the cabbage lengthwise and crosswise along the stalk and then tear it into quarters by hand. Wash and let it drip off slightly. Then salt well between the leaves, especially on the stalk. Place the quarters in a suitable bowl, weigh them down with a plate and let them soak for a few hours (or overnight) until they are completely soft.
Kimchi expert Ahn Mun-sukshows how to do this. I do not pre-water the cabbage, by the way. But if you do, it doesn't hurt.
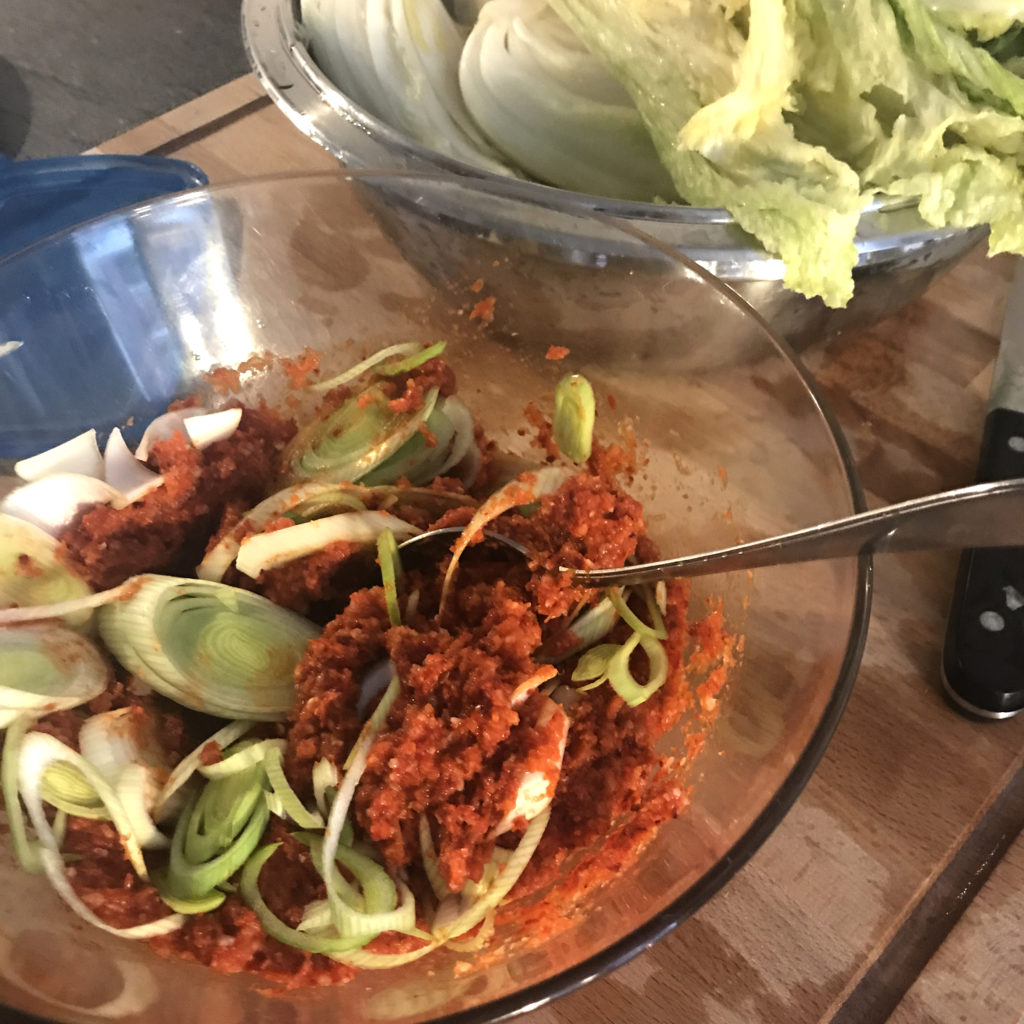
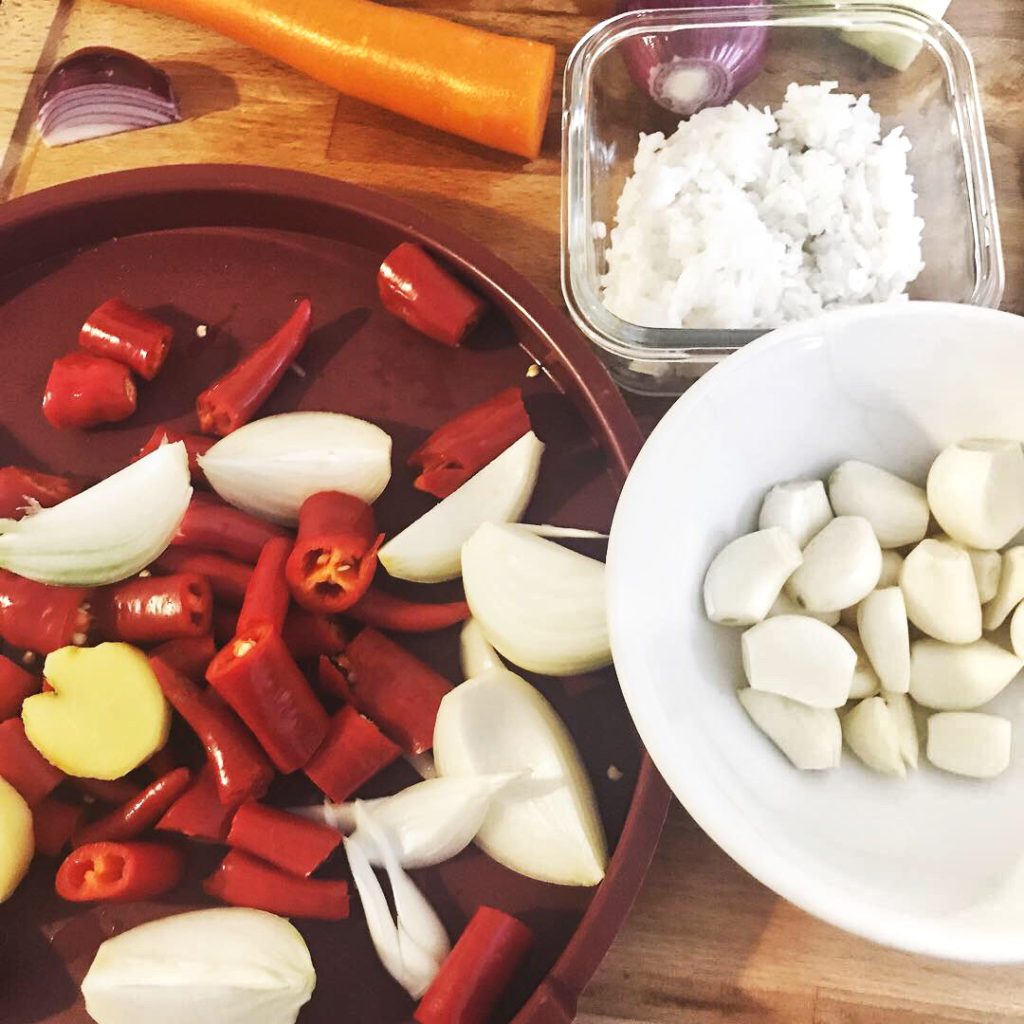
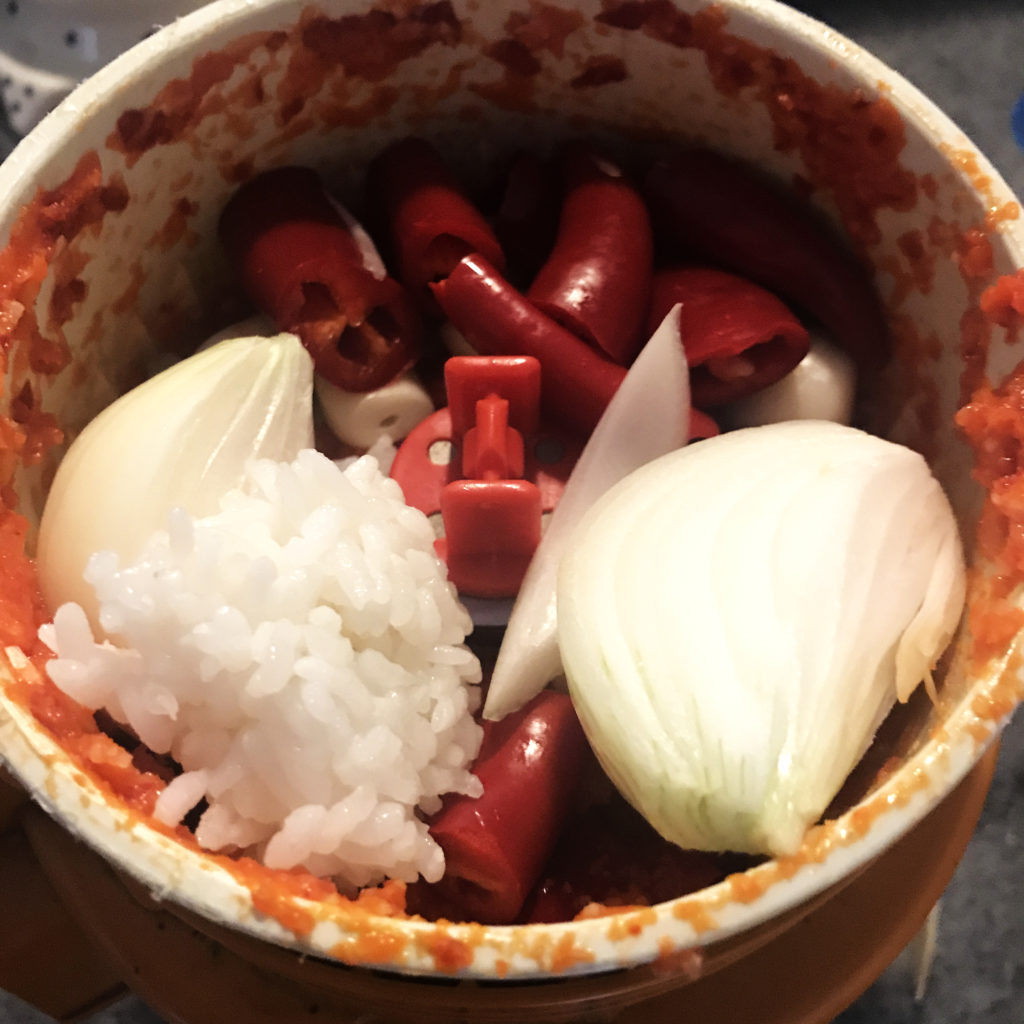
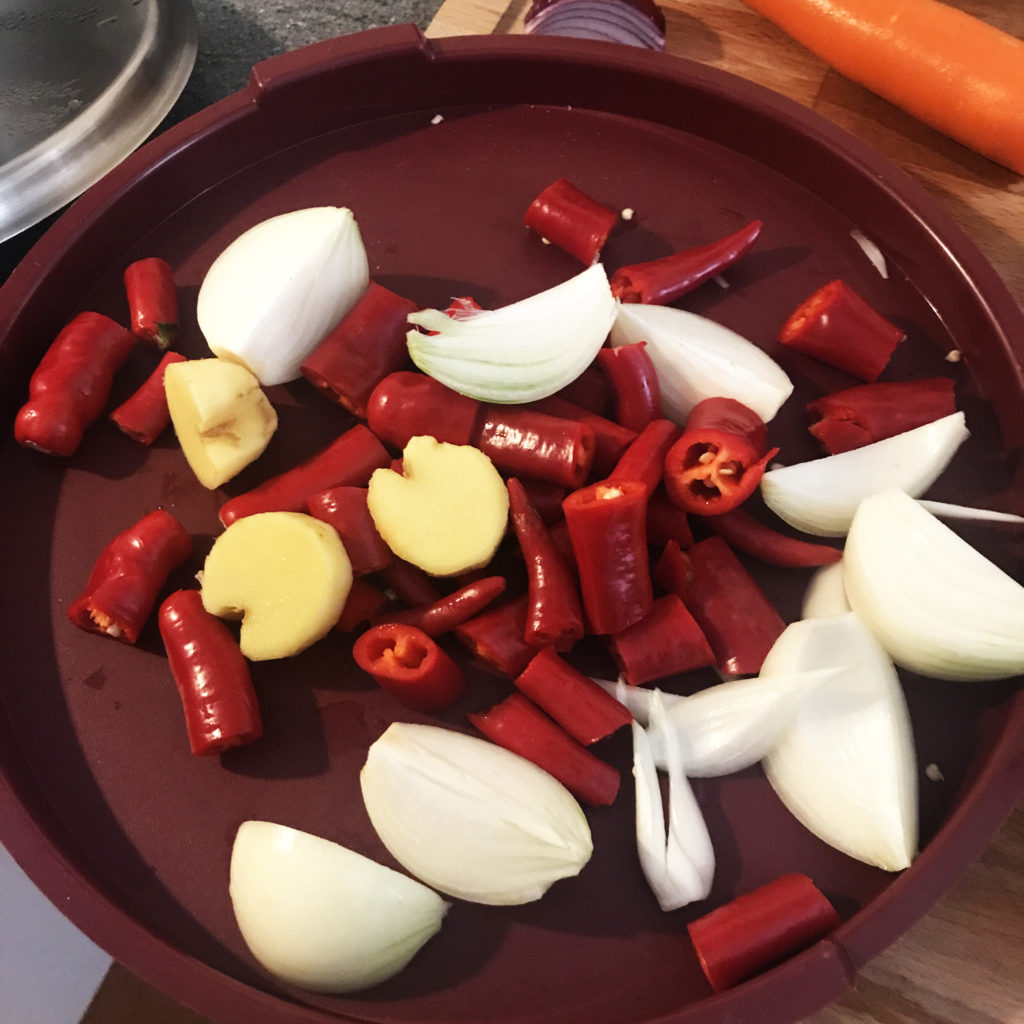
Arbitrarily chop onion, garlic cloves, chili pepper and peeled ginger, add sugar, rice, gochugaru, fish sauce & water and puree to a flavor paste with a hand blender. Of course you can also do this in a food processor. The gochugaru make the paste absorb a lot of water, after a few minutes you can easily add more water. The 6 tablespoons from above are a guideline.
While the puree is infusing, remove the very dark green from the leek and cut the rest into fine, diagonal rings and the carrot into tender julienne. Mix the leek rings and carrot strips with the paste.
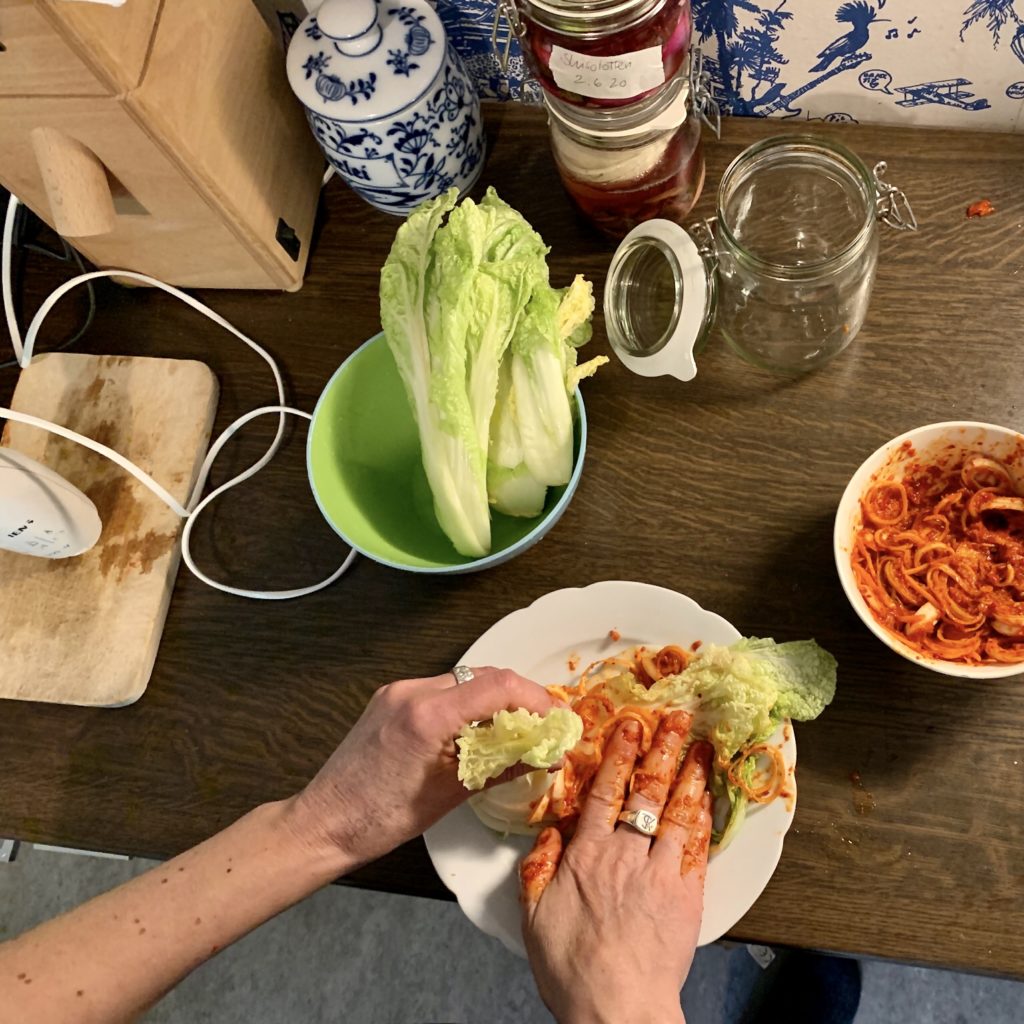
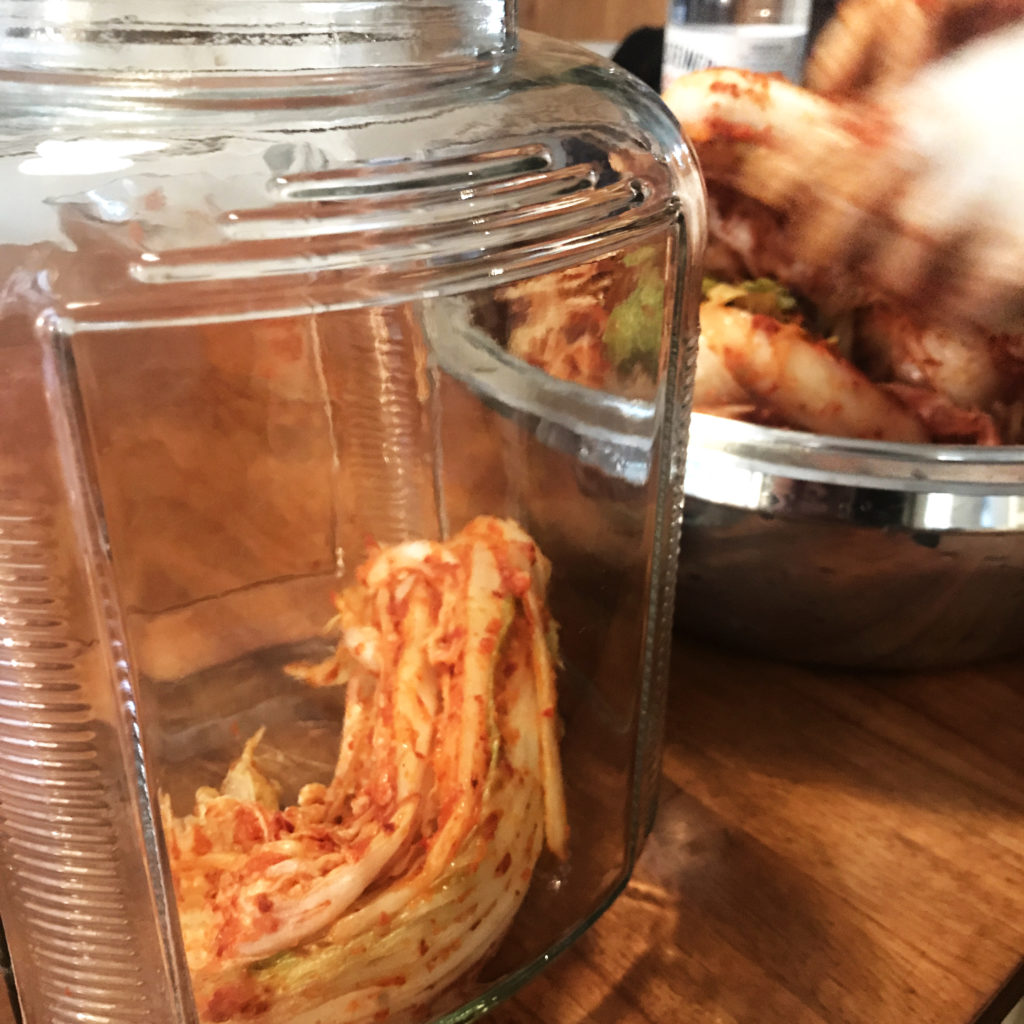
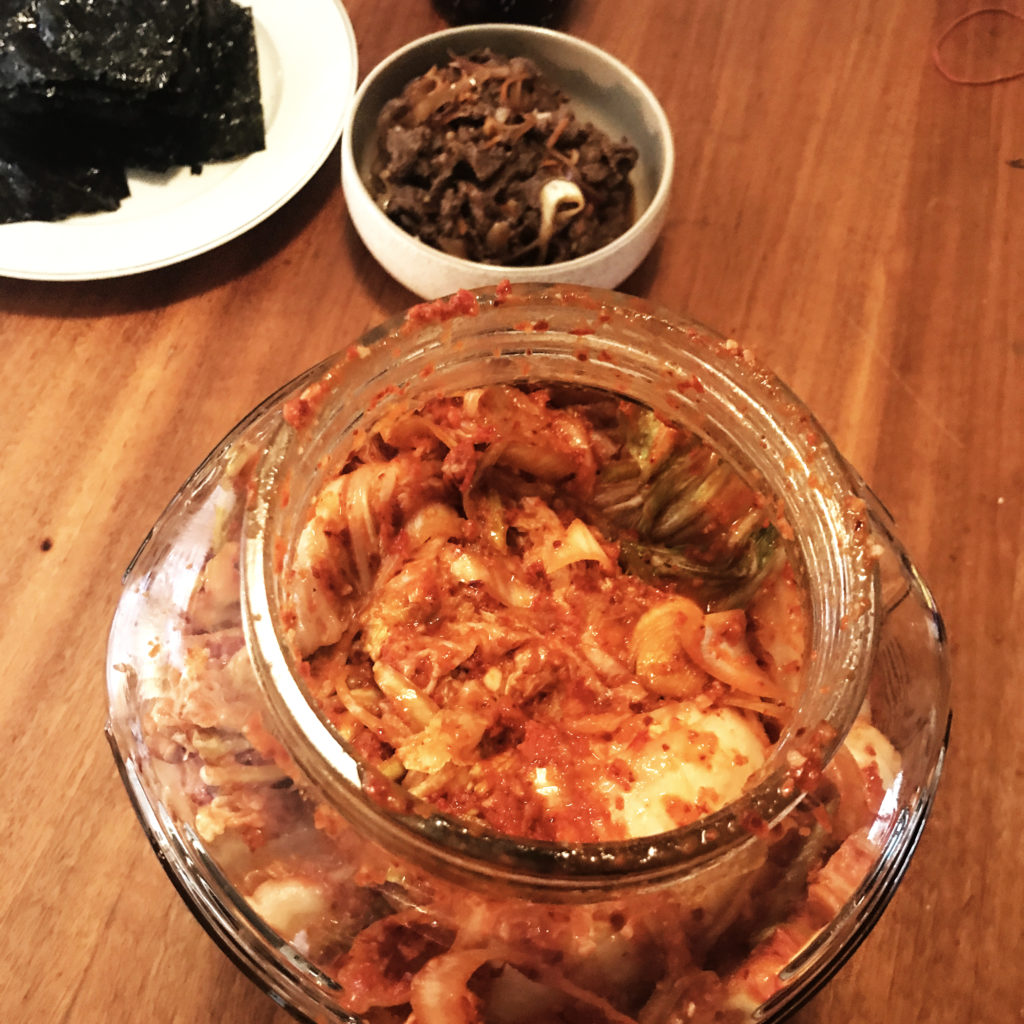
The next step is the most fun. This is the part where the napa cabbage is rinsed, wrung out and then lovingly massaged with the paste. Spread it well between all the leaves, then roll up the quarters like roll-ups and stuff them tightly into an flip-top glass. Press down neatly while doing so, as little oxygen as possible should remain between the layers.
Does the kimchi always have to be covered by brine?
If the kimchi is eaten fresh and ferments for a maximum of 3 days, it doesn't matter if not everything is covered by brine. The chili powder also creates a good microclimate in the ferment and prevents the formation of mold. With Kimchi, you have the least fear of mold.
The ingredients of many spicy fruits inhibit the growth of bacteria. Perhaps that is why spicy seasoning has become widespread in countries where the growth of bacteria (even undesirable ones) is favored by the prevailing climate.
So, to be very clear, kimchi is a ferment that does not need to be covered by brine because it is covered by the kimchi paste. That is all it needs.
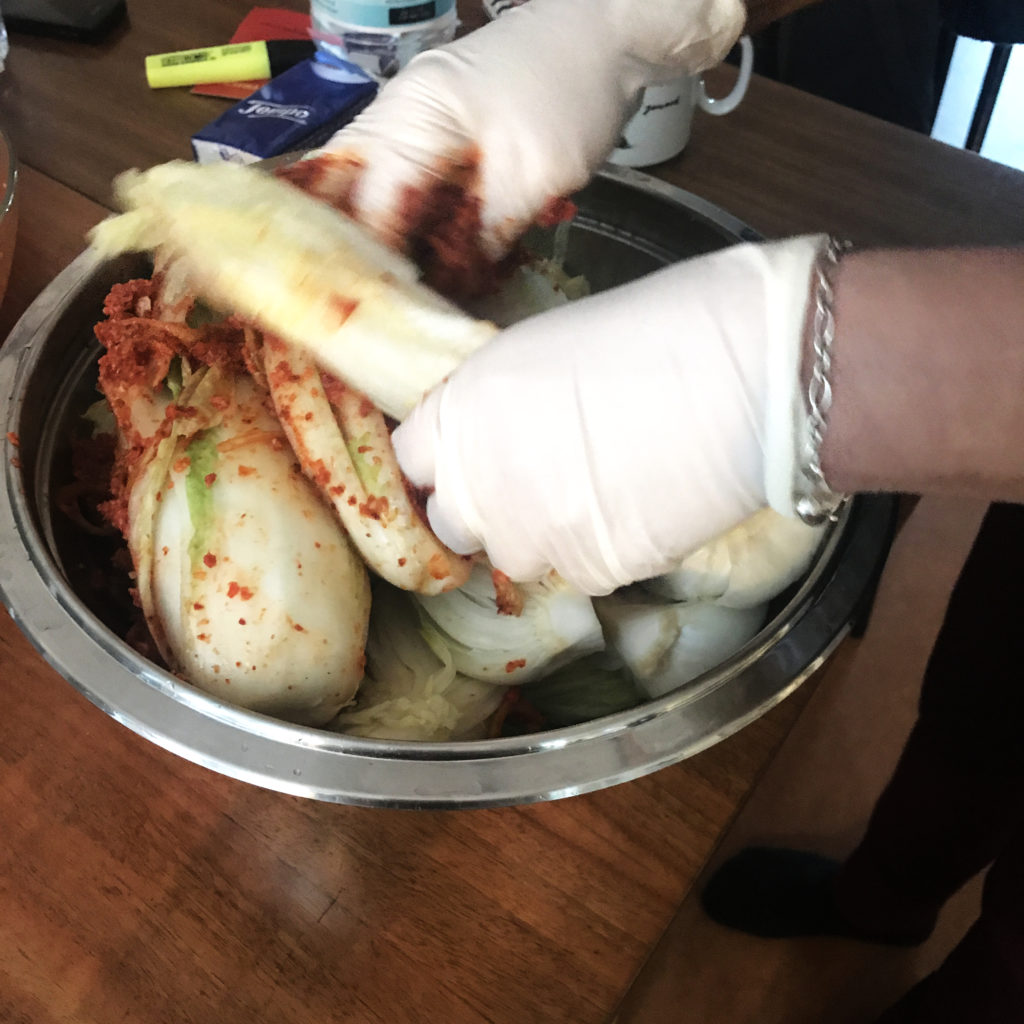
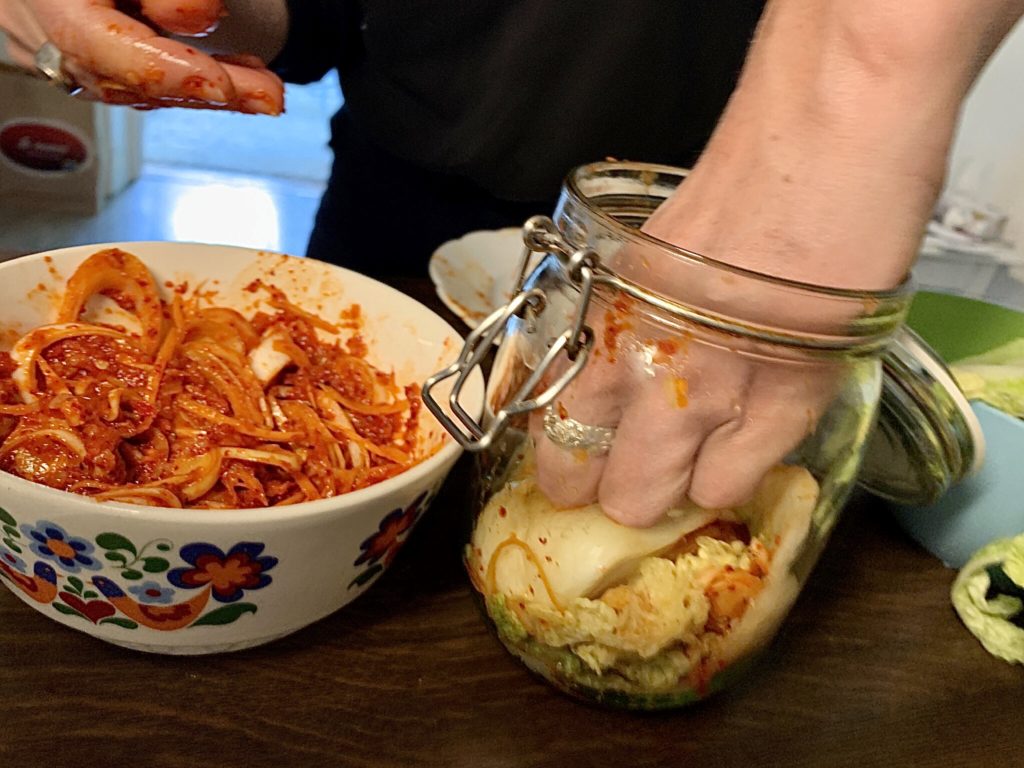
PS. Depending on what else you have planned for that day, it might be a good idea to wear gloves when handling chili.
When to eat the Kimchi, your taste decides.
I put it in the refrigerator after 3-4 days to slow down the fermentation. It rarely gets older than 2 months, since we like it much too much.
Rice or rice flour?
I use white basmati or jasmine rice, whatever I have in the house. Korean round grain rice is really nice, but you can't always access it easily outside of Korea.
If you don't have any cooked rice on hand and don't want to cook half a handful of rice, you can also use glutinous rice flour. You can get it in Asian stores, usually it says glutinous rice flour on it. This is not the same as normal rice flour, and it is essential to use glutinous rice flour!
For the right consistency, take 50g of glutinous rice flour to 250ml of water. Boil the rice flour in the water until it thickens, then add the remaining ingredients for the puree, exactly as described above.
Kimchi prepared with glutinous rice flour ferments faster and becomes more pungent. I like the kimchi with rice much better.
Not all kimchi is the same
There are as many different kimchi recipes as there are families in Korea. Therefore, there is not one true recipe. I like this one the best, and I'm sure that has to do not only with the great taste, but also with my history. And if I ever feel like making a variation, I make bachelor kimchi. You should try that, too!
Tolles Rezept und schöne Webseite, weiter so ☺️
Vielen Dank <3
Hi, kippe ich das gezogene Wasser des Kohls später wieder in das Bügelglas oder lasse ich das weg?
Hej Tobias,
nicht nur wegkippen, sondern ausspülen und auswringen, wie oben beschrieben. Sonst würde der Kimchi zu salzig und zu wässerig.
Viel Spass!
Katsu
Da liest man das dreimal und sieht es dennoch nicht. Wenn die Lake nicht reicht…einfach 20%ige Lösung mit Wasser ansetzen und zugeben?
Moin Tobias,
nein, bitte nicht. 20% Salinität ist viel zu viel. Ich nehme grundsätzlich 2%, bis auf Ausnahmen. Kimchi hingegen muss nicht von Lake bedeckt sein. Das hat drei Gründe:
1. Kimchi ist von der Würzpaste eingehüllt, das ist ausreichend.
2. Chili helfen beim Verhindern von Schimmel durch ihre Inhaltsstoffe
3. Kimchi ist ein Kurzzeitferment und kann nach ca. 5 Tagen entweder gegessen werden, oder kalt gestellt.
Viel Erfolg!
Katsu
Hab ihn jetzt nach einem Monat im Kühlschrank wiederentdeckt…:-( Sieht optisch aber alles tutti aus.
Das macht gar nichts! In Korea wird Kimchi im Herbst in grossen Behältern gemacht und den ganzen Winter über verzehrt. Wenn Fermente kühl stehen, macht auch die Kälte sie länger haltbar. Wenn nichts schimmelt, ist ja alles prima. Probier doch mal und schau, wie er Dir schmeckt. Und berichte gerne wieder!
Wow, was für eine tolle Seite! Bin grade ganz happy, sie gefunden zu haben. Bin ganz neue Fermentista und das hier inspiriert mich sehr. Interessant auch, dass dieses Kimchi so ziemlich anders zubereitet wird als in dem Rezept, dem ich gefolgt bin. Als nächstes probiere ich Deins! Auch das Georgische Kraut klingt superlecker! Hast zu auch ein Rezept für Tomaten? Dankeschön für die vielen Anregungen 🙂
Liebe Sandra,
danke für das Lob! Ich freue mich sehr, dass Dir meine Seite gefällt. Es steckt auch viiiiiiel Liebe – und Arbeit – drin 🙂
Dieses Rezept ist für den klassischen Kimchi. Viele Leute machen gerne Mak Kimchi stattdessen, das ist ein schneller Kimchi, bei dem man den Kohl von Anfang an in mundgerechte Stücke schneidet. Vielleicht hast Du so einen Kimchi gemacht?
Georgisches Kraut werde ich auch wieder machen, wenn die Kohlsaison beginnt, ich habe nämlich nur noch ein Glas im Vorrat.
Ein Rezept für Tomaten habe ich nur als fermentiertes Chutney aus grünen Tomaten, das kann ich gerne demnächst mal aufschreiben.
Viel Freude und Erfolg beim Fermentieren und viele Grüße,
Katsu
Tolles Rezept! Danke, dass du auch betonst, dass es nicht das eine richtige Rezept gibt und die unterschiedlichen Methoden alle ok sind.
Weil ich es hier grade gesehen hab: BITTE NEHMT EURE RINGE AB, wenn ihr in der Küche sauber arbeiten möchtet und am besten auch Armbänder und Uhren (v.a. beim Fermentieren). Ja, glatte (Ehe-)Ringe kann man potenziell reinigen, aber beim bloßen Händewaschen werden die nicht sauber genug.
Danke für das Kompliment! Ich hoffe, der Kimchi gelingt und schmeckt Dir.
Aber bitte lass die Leute Ringe tragen, wenn sie möchten. Diese überholte Angst vor Keimen hat gerade beim Fermentieren nichts verloren. Ich wasche Hände und Ringe selbstverständlich regelmässig und Ringe mit Edelsteinen setze ich meistens ab. Aber nur, damit die Steine nicht leiden.
Also, entspann Dich und verbreite bitte keine Angst.
Ach so, kleiner Nachsatz. In der Profiküche darf es das natürlich nicht geben, das sollte klar sein.
Hallo – vielen Dank erst mal für deine tollen Rezepte! Ich bin begeistert. Zu diesem Rezept habe ich eine Frage: Für welche Gefäßgröße sind die Mengenangaben ausgelegt? Liebe Grüße, Nadja
Hej Nadja,
das kommt darauf an, wie groß dein Chinakohl ist. Ich benutze 750-ml bis 1,5-l Gläser für einen Chinakohl. Wenn ich mehr mache, noch größere Gefäße. Falls das Gefäß ein bisschen zu klein ist, schneide ich eine Ecke ab und esse den Kimchi frisch.
Gutes Gelingen!
Katsu
Hi
Wie lange muss denn kleingeschnittener Kimchi fermentieren? Ist er schon fertig, wenn es noch blubbert beim Draufdrücken? Und wie lange ist er nach einer so kurzen Fermentation haltbar?
Danke und liebe Grüsse
Hej Aline,
Kimchi ist schnell fertig, nach 3-4 Tagen kannst du ihn probieren. Haltbar ist er monatelang.
Gutes Gelingen!
Katsu
Hallo Katsu,
nachdem das „Nachkochen“ so gut geklappt hat und das Kimchi 4 Tage bei Raumtemperatur fermentiert ist, stelle ich mir vor der ersten Verkostung die Frage der Portionierung.
Nimmst Du immer so eine ganze Roulade raus? Dann wäre nach nur viermal essen schon der ganze Topf leer!!
Danke für Deine Tipps und liebe Grüße
Thomas
Hej Thomas,
ja, deswegen mache ich auch sehr viel Kimchi. Meistens esse ich eine ganze Rolle. Ich wickele sie aus, lege sie auf ein Brett und schneide sie quer zum Strunk in Streifen.
Falls ich doch mal weniger Appetit habe, schneide ich nur bis zur Hälfte und bewahre den Rest im Kühlschrank auf.
Bon appétit!
Katsu
Hi Katsu,
Ich würde gerne Mak Kimchi machen erscheint mir für mich einfach praktischer, da man auch kleine Mengen entnehmen kann und evtl auch mehr ins Glas hinein bekommt. Was muss ich beachten oder verändern ? Oder kann ich mit dem klein geschnittenen Chinakohl einfach wie bei traditionellem Kimchi vorgehen ?
Michi
Hej Michi,
gehe so vor, wie ich es schon beim Weisskohl Kimchi beschrieben habe.
Gutes Gelingen!
Katsu
Hallo Katsu,
ich habe gehört dass manche Weißkohl nach Kimchi Art machen. Das Stelle ich mir auch.lecker vor. Hast du da einen Tip ? Ich habe nämlich noch einen großen halben Weißkohl übrig und würde das gerne mal probieren. Vielleicht einfach so wie bei dem Junggesellen Kimchi ?
LG Michi
Hej Michi,
auch das wird in Korea gemacht, der Name ist Yangbaechu Kimchi. Dafür wandelst du dieses Kimchirezept einfach ein bisschen ab.
Schneide einen Weisskohl mundgerechte Stücke, wasche sie und lasse sie abtropfen. In einer Schüssel mit Salzlake (hier nehme ich vier gute Esslöffel pro Liter Wasser) gut vermischen und ca. 2 Stunden stehen lassen, bis der Kohl weich ist. Zwischendurch immer mal wieder wenden. Wenn er weich genug ist, abspülen und abtropfen lassen und im Rezept mit der Kimchipaste weitermachen.
Das Einmassieren wird etwas anders gemacht, du fügst alle Zutaten in einer Schüssel zusammen und vermengst es gründlich. Dann kommt der Kimchi ins Glas.
Gutes Gelingen!
Katsu
Super ! Ich danke dir sehr für die schnelle Antwort. Dann leg ich gleich mal los. Dein Buch hab ich mir übrigens gerade vorbestellt. Ich freu mich schon drauf.
LG
Vielen Dank, das freut mich!
Schmeckt super! Ich hatte keinen Reis zur Hand und hab ihn einfach durch eine gekochte Kartoffel (auch Stärke, wie der Reis) ersetzt. Chili hatte ich von vorigem Jahr fermentiert im Glas und hab einen Teil fürs Kimchi weiterverwendet.
Danke, Katsu, für deine guten Erklärungen. Auf der Basis kann man Variationen ohne weiteres riskieren 🙂
L G Klaus
Hej Klaus,
wie schön, dass es gut geworden ist und danke für die tolle Rückmeldung!
Herzlich,
Katsu