
Miso (Japanese 味噌) is a seasoning paste that has been traditionally fermented in Japan for centuries from soybeans, salt and kōji. Kōji is steamed rice, barley, other grain or pseudo grain on which kōji mold spores have been cultivated. This fabulous mold, scientifically officially called Aspergillus flavus var. oryzae produces α-amylases as it multiplies, which break down starch into sugars. Japanese cuisine without kōji or miso is unthinkable.
Making miso yourself is basically super simple, but requires some preparation and a bit of math, which is why I've broken this recipe down into quite a few steps to make it easier to understand. I had quite a knot in my head the first two times I made miso, then the third time I really got it and since then I would be exaggerating if I said I pull miso out of my hat - but somehow it's something like that.
Of course, I will never come close to claiming to make authentic miso and bow to traditional preparation. If you enjoy eating umami as much as I do and enjoy advanced fermentation, this recipe is for you. Original Japanese miso can be found in Japan - or Japanese-run manufactories.
The best season to make miso
In the late fall or early spring, conditions are optimal for the miso production cycle because the air is relatively free of microorganisms due to the cold, but not too cold that fermentation cannot start. Traditionally, miso is made in late fall. Miso, like all other ferments, ferments more slowly at lower temperatures, which helps develop a more complex flavor. Since we mostly live in temperature-regulated residences these days, the time of year is no longer a priority; you can just put the miso in the basement or another cool room to start. I still like the tradition so much that I traditionally make my miso in the winter.
Recipe for miso 味噌
INGREDIENTS
- 500 gr. dried organic soybeans
- 500 gr. koji (100%)
- ~ 230 gr. rock salt without additives (13-14%)
- 2 tbsp seed miso
- ~ 475 ml cooking water from the soybeans
TOOLS
- large pot or pressure cooker
- large bowl, strainer, wooden spoon, jug
- meat grinder / potato masher, mixer
- fermentation vessel (min. 3l)
- cover
- weight
- kitchen towel & rubber band
By the way, if you're unsure about anything with my recipe, please do ask me about it! This helps not only you, but also others, because I can explain it better and add it to the recipe. Please use the comment field at the bottom of the page.
PREPARATION
- Get kōji
- Organize seed miso
- Get vessel
- Buy and saw cedar wood
- Assemble weights
- Soak soy beans
Get kōji
Miso is not a spontaneous or wild ferment that, like vegetables, ferments only with the help of the lactic acid bacteria present in the environment. That's why you need the starter culture Kōji. Kōji can be grown on a carrier substance such as rice or barley with the help of Aspergillus flavus var. oryzae However, this requires constant temperatures and high humidity, which, at least in Germany in winter, is not feasible without additional equipment.
I buy kōji at the macrobiotic store or order it online at fermentationculture.eu ***
Organize seed miso
To get the fermentation process getting on the right track from the start, it is helpful to add 1-2 tablespoons of so-called seed miso. SaatmisoSeed miso is unpasteurized miso that you can get from your fermentista friends, or see if you can get unpasteurized miso at the organic grocery store. If you don't have any, it's not problematic, your miso will still turn out just fine.
Get vessel
The appropriate vessel should have 1.5 times the volume of the miso to be made. For the above amount of miso, this is a container of at least 3 liters because the dried beans and dried kōji approximately double in weight after cooking / rehydration. The vessel can be glass, ceramic or wooden, with cedar barrels being the traditional option. It is important that the walls of the vessel are straight enough to allow the cover board and weights to be layered well on top of the miso.
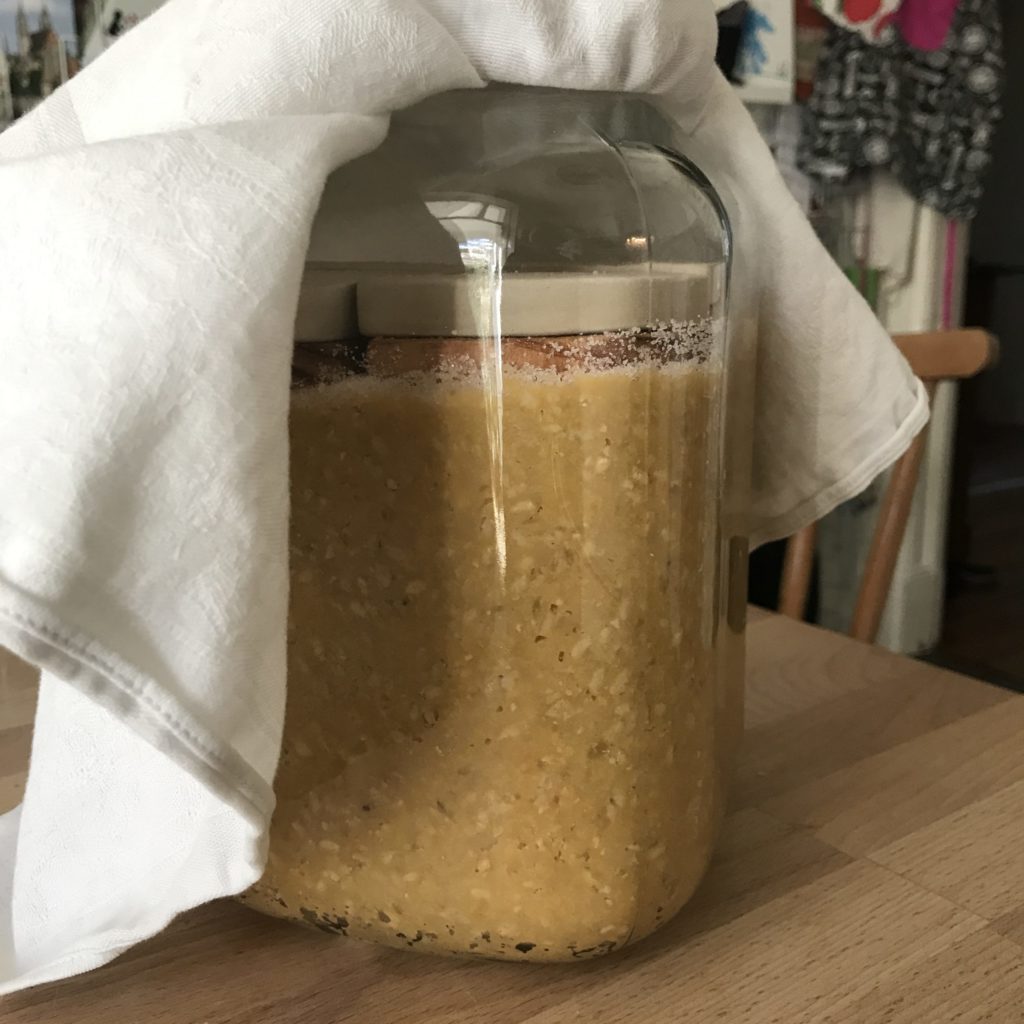
I appreciate flip top jars, even when fermenting miso. Especially for your first miso, it is an advantage to have the fermentation progress in view at all times. Large jars from 3 liters are usually rectangular and well suited. Because miso is fermented osmotically, you simply remove the handle and glass lid before filling.
Buy and saw cedar wood
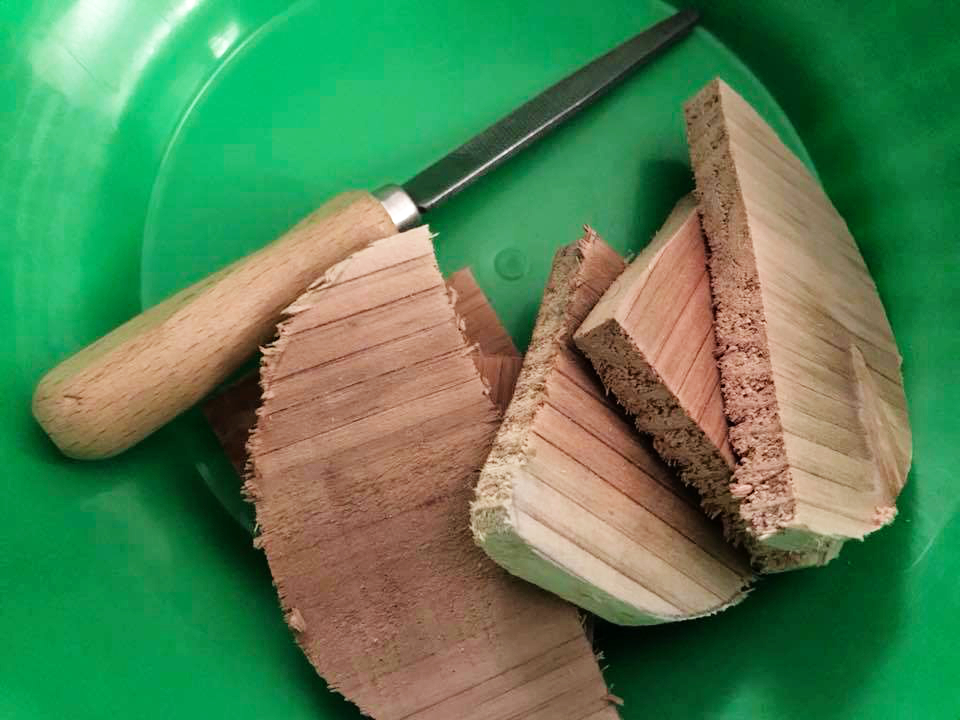
After the miso is filled into the vessel, it must be covered with wood and weights. You can make the wooden cover yourself - in fact, I haven't seen it for sale anywhere anyway. The choice of wood is simple. Traditionally, miso is aged in cedar barrels, so you need cedar boards. You can find these wherever barbecue supplies are sold, sometimes they are called smoking board.
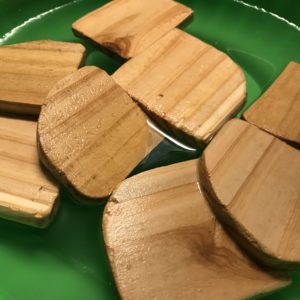
Make a paper template of the inside of the vessel and divide it into 2-4 pieces (the board must somehow get into the vessel, and for this it must pass through the opening). Then saw the board to size and file it cleanly. The resulting cover board can be used several times.
If this is too time-consuming for you, you can also use cut baking paper or waxed cloth instead of wood.
Assemble weights
Miso is traditionally weighted with as much weight as it weighs itself (a little less works too...). I have some ceramic weights that I like for miso making because they are so heavy. Porcelain plates work too, of course, as long as you can get them through the opening, or glass lids from, say, canning jars.
Whatever weight you choose, remember that it should be food safe and not affected by the lactic acid. The exception might be if you layer so many boards on top of the miso that the weight does not come into contact with the miso or the resulting tamari even after weeks. Then you can decide for yourself whether you want to use cleaned stones, as tradition would have it.
Soak soy beans
The night before the day you make the miso, soak the dried soybeans in plenty of water. They should soak for at least 12 hours.
PREPARATION
- Cook the beans
- Calculate the amount of salt
- Blend beans, kōji and salt
- Prepare fermentation vessel and fill in miso
- Place cedar board and weights
- TIP ➩ Avoiding mold growth
- Observing the maturing process
- When will the miso be ready?
- Store finished miso
Cook the beans
Drain the soaked beans and simmer over low heat until they are so soft that you can easily mash them between your fingers. This is faster in a pressure cooker, but in a regular pot they will be ready after about 2-4 hours. Drain and save at least 500ml of the cooking liquid to rehydrate the dried kōji. Allow to cool to hand heat, about 40-50°C. Too much heat will destroy the kōji.
Meanwhile, water the cedar planks in a bowl so they don't draw too much moisture from the miso later.
Calculate the amount of salt
While the beans are cooling, the amount of salt is calculated. Depending on the ingredients, the type of miso and the planned fermentation time, different percentages of salt will result (see the kōji table at the end of the recipe). For this miso, that's 13-14%. The beans weighed 1150 gr. after cooking, plus the weight of the kōji gives a total weight of 1650 gr. 13-14% equals 230 gr. of salt. Branch off 3-4 tablespoons, they are needed later.
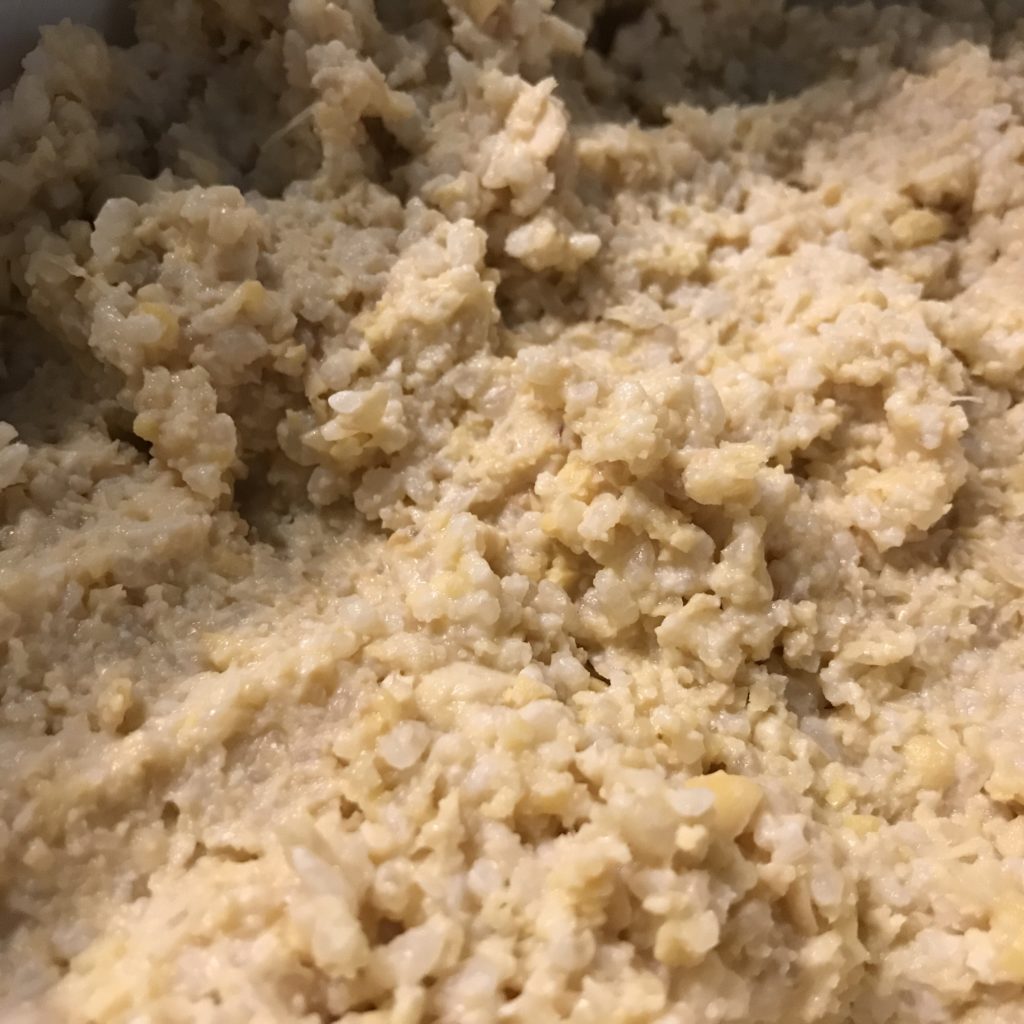
Blend beans, kōji and salt
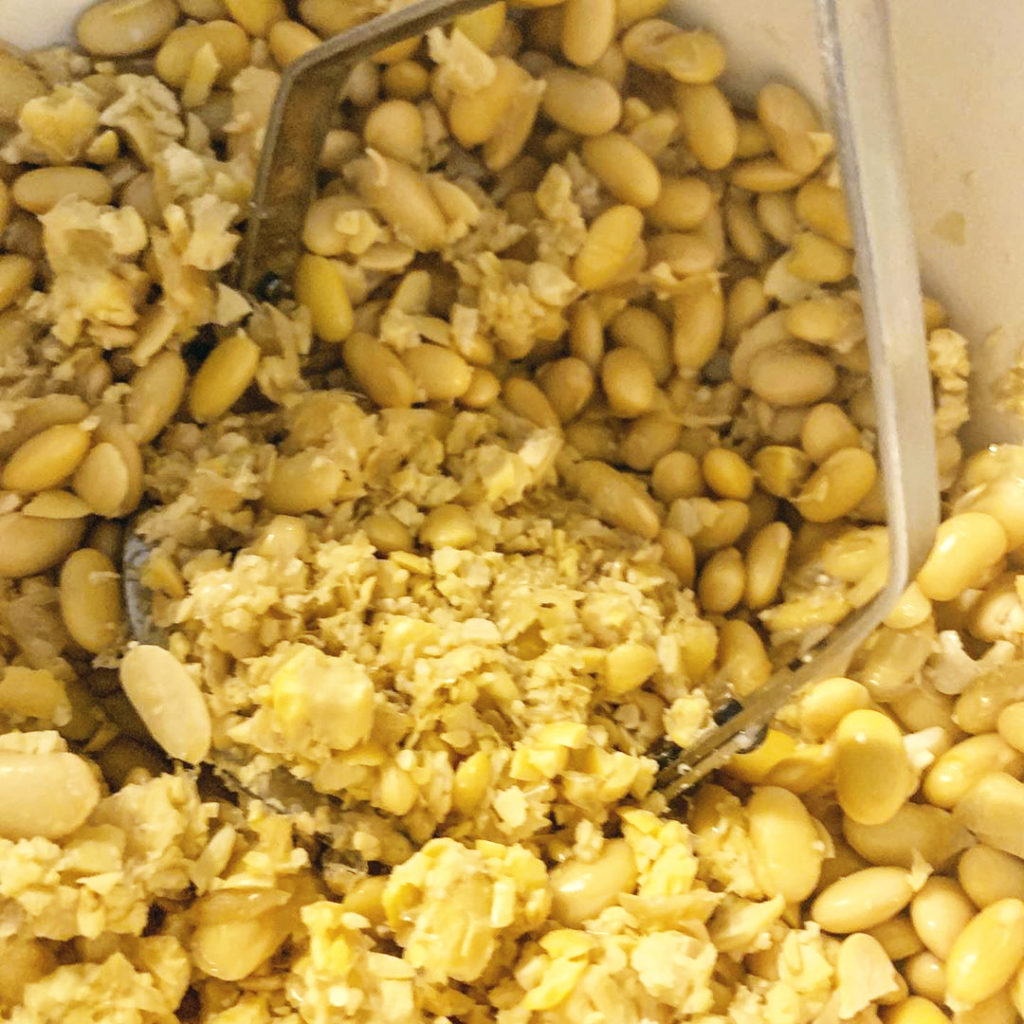
When the beans have cooled (don't let them get too cold, chilled beans are difficult to grind), mash them. The consistency can be chunky or smooth, depending on whether you like a coarser country miso or a creamy texture. A meat grinder for initial mincing is great, a potato masher will do as well.
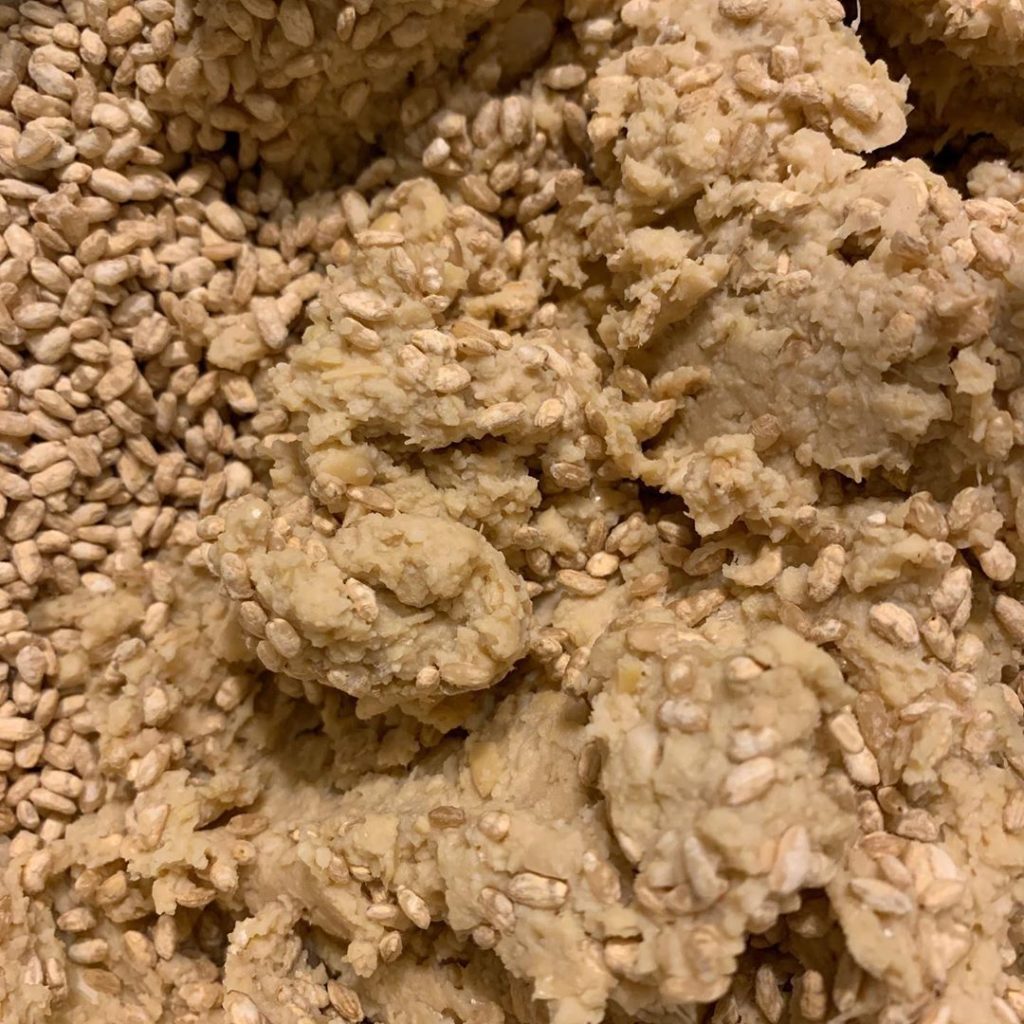
Break apart the kōji and mix with the salt. Add to the soybean paste along with the seed miso and mix evenly. If your kōji was dried, it will soak up a lot of liquid, which can be added back with the reserved cooking water. First add 350ml, knead and let stand for a few minutes. The miso should be doughy and well moist, not wet. You will need to wait at least 30 minutes to make the final consistency assessment to allow the moisture to penetrate the kōji grains. Adjust by tablespoonfuls with cooking water. Miso that is too wet will mold, and that would be a shame.
For a finer texture, a hand mixer can be used afterwards.
Prepare fermentation vessel and fill in miso
The glass should be clean. Swirl with water and sprinkle the insides with salt. For this purpose, use about 1 tablespoon of the salt diverted.
Form the miso into tennis ball-sized scoops and throw them into the jar with verve. Press down vigorously and diligently with your fists, there should be no air pockets at all. If in doubt, you can use a chopstick to finish the job. When all the miso is in the jar, thoroughly clean the rest of the inside of the jar with a kitchen towel moistened in alcohol, vodka works well. Smooth the surface of the miso well and sprinkle with the remaining salt. While doing this, shake the vessel so that the salt seals all the cracks. It is more important that everything is covered with salt than that the amount of salt is accurate to the gram, so if in doubt, please add a tablespoon more.
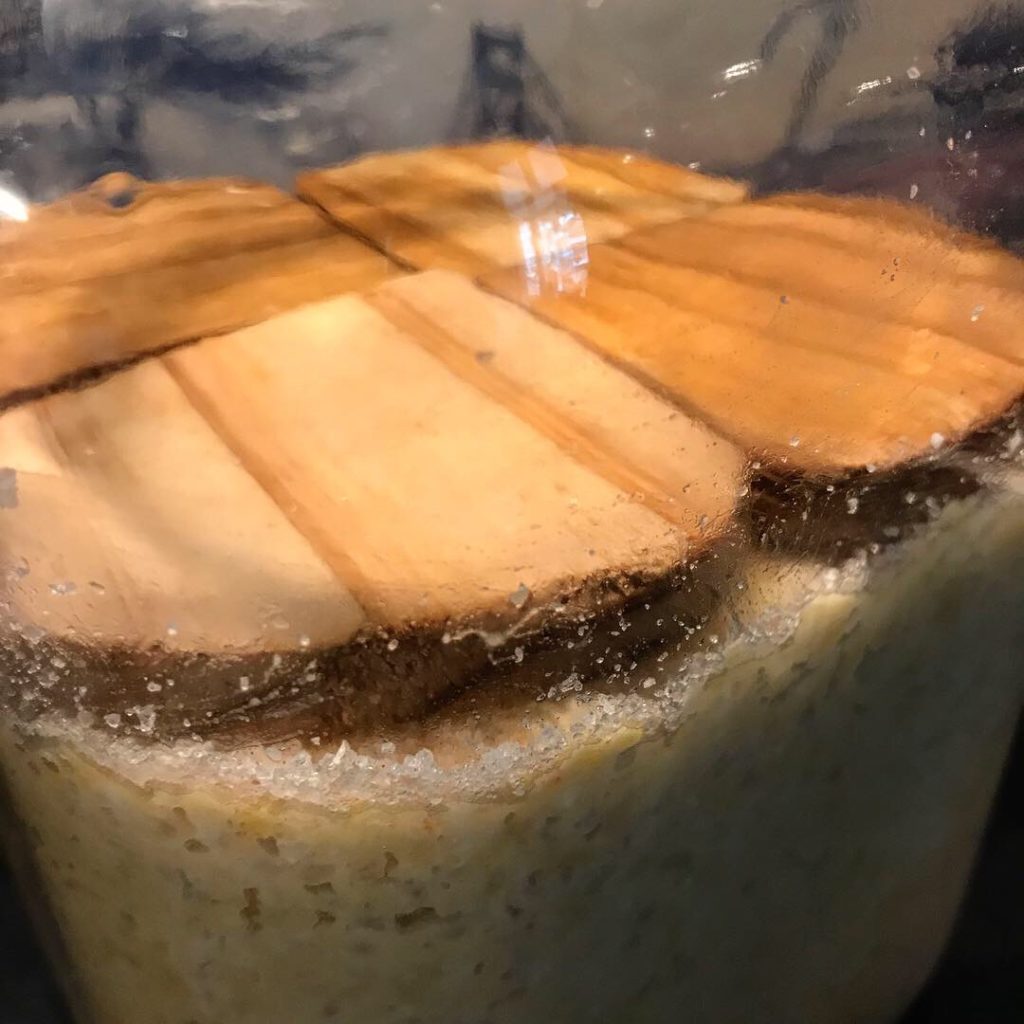
Place cedar board and weights
Weights are essential for making miso. Without sufficient weight, the miso will not ferment well and in the worst case will taste sour and of esters.
The sawn to size, watered cedar boards come on the salted surface first. Then on top of it at least a little less than a kilo of weights. The vessel is closed with a kitchen towel, which is attached to the rim of the jar with a rubber band. Miso needs darkness to ferment, so it is good if the kitchen towel covers the jar to the bottom. I always use great-grandmother’s white damask napkins.
Place at ideally 18° - 20°C in an easily accessible place so that you can observe the fermentation. For this purpose, every few days lift the cloth and take a peek.
TIP ➩ Avoiding mold growth
Aerobic and soletolerant molds can spread in miso. The three best countermeasures are
- to avoid possible air pockets,
- to seal the surface of the miso with salt and
- rubbing the inside of the container with alcohol.
Observing the maturing process
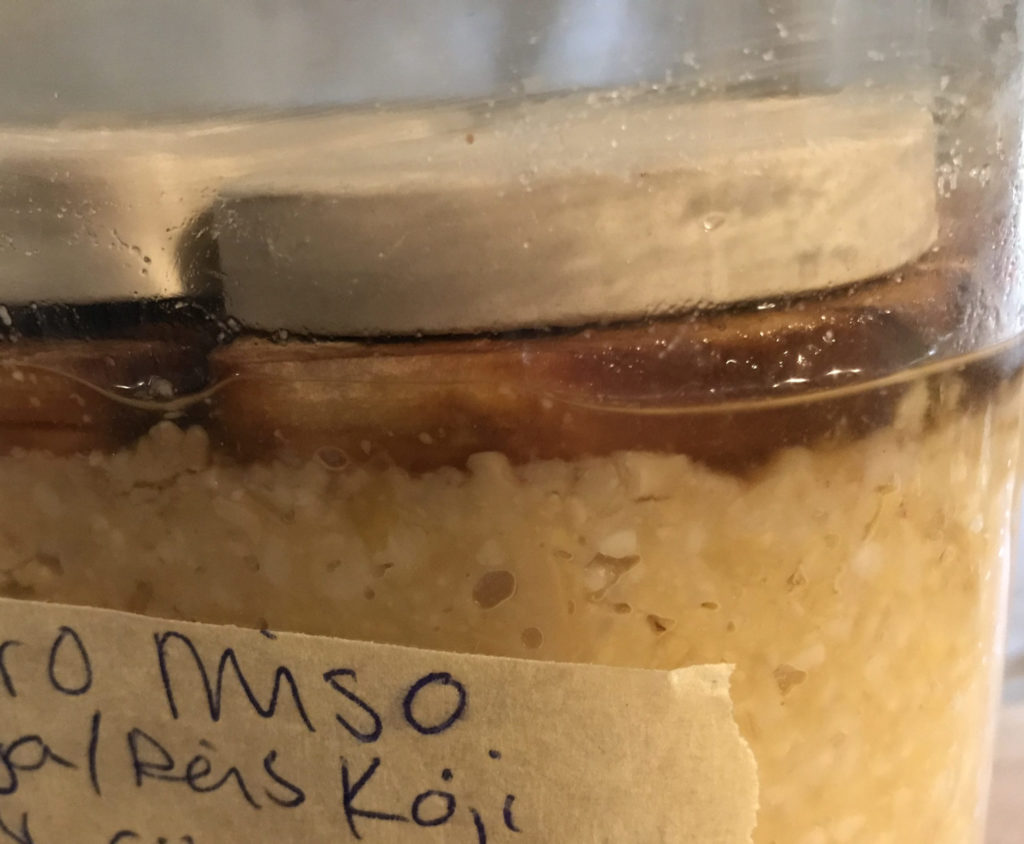
After 3-4 weeks, a brown liquid should appear on the surface, around the cedar boards. This is tamari and the sign that fermentation is progressing as desired. Now you don't need to check the miso every few days and just put it away. If no tamari is visible, there probably wasn't enough weight on the miso. Add weight and continue to check the miso every few days.
Some miso manufacturers recommend unpacking and stirring the miso after 3 months. I have never done this, but I do not think it is bad. After stirring, the miso must of course be packed well again. When temperatures rise and it gets very warm, in summer for example, the miso will mold easily. At temperatures above 25°C, I advise opening and stirring the miso to prevent mold. I've done this myself many times - and when I didn't, I had mold on my miso... It's best to put the miso in a cooler place if possible during hot summers.
When will the miso be ready?
Dein Miso ist fertig, wenn es einen rotbraunen Farbton und einen würzigen Geruch angenommen hat. Das Aroma kann durchaus eine leicht alkoholische Note haben und angenehm hefig riechen. Ein starker alkoholischer Geruch impliziert, dass das Miso zu warm geworden ist und noch weiter fermentieren muss. In diesem Fall kühler aufstellen und länger fermentieren lassen.
I give this miso 2 years to develop a round, balanced taste. However, you can already take a jar after one year for consumption, if the taste appeals to you.
Store finished miso
Fill the finished miso to the brim in screw jars and store in the refrigerator. There, the fermentation is basically stopped and the taste is preserved. If you prefer a smoother texture, you can blend the miso again with a hand blender or in a food processor before filling.
By the way: Not all miso is the same
Depending on the predominant proportion of ingredients, miso is divided into three types: mamé miso (bean miso, jap. 豆味噌), komé miso (rice miso, jap. 米味噌), or mugi miso (barley miso, jap. 麦味噌). If you take kōji where Aspergillus flavus var. oryzae was cultivated on natural rice instead of white rice, you're making Genmai Miso (jap. 玄米味噌).
A distinction is also made according to color. Red miso is called aka miso (jap. 赤味噌), white miso is called shiro miso (jap. 白味噌). Usually, red miso tastes more intense than white miso. There are quite a few other classifications, for example by flavor or, in Japan, even by region. Mixed miso is known as Awase miso (jap. 合わせ味噌).
Shiro Miso has a greater proportion of rice koji than Aka Miso and is fermented only briefly. The longer you let miso ferment, the darker the color becomes. My oldest miso has now taken on the hue of dark chocolate and developed an incredibly savory umami flavor.
Ideas for more miso flavors
Miso, by the way, does not have to be made from soybeans, barley or rice. If there is enough protein, carbohydrate or fat, the miracle mold Aspergillus flavus var. oryzae can transform other legumes as well. I've made excellent miso from chickpeas and rice kōji, and Peaso, the yellow pea miso from Danish restaurant noma, is legendary.
Ratio of kōji, soybeans and salt for different miso varieties
The following table summarizes the ratios of kōji, beans, and salt, as well as the fermentation time for various types of miso.
| kōji | salt* | taste | kōji share** | duration | color |
|---|---|---|---|---|---|
| rice | 5-6% | sweet | 150-300% | 10-14 days | white, red |
| 9-11% | mild | 100-150% | 3 months | light~red | |
| 12% | standard | 100% | 4 months | light~red | |
| 13-14% | salty | 50-100% | 6 months | red | |
| barley | 9-11% | mild | 150-250% | 3 months | light~red |
| 12% | standard | 100% | 4 months | light~red | |
| 13% | salty | 80-150% | 6 months | red | |
| soy | 10-12% | just soy | 6-12 months | reddish-brown | |
| others | 10-12% | 100% | 3-6 months | light~red |
* Salt content as a percentage of the total weight of all ingredients after cooking.
** kōji content to 100% weight of soybeans (both in the dried state).
Table from the book 誰でもできる手づくり味噌 (Handmade Miso) by Nagata Juzo, page 29
*** If you order via the linked recommendation, part of the purchase price goes to me (without incurring any extra costs, you know the principle under the name Affiliate Links). I perceive the commission as your appreciation for my work as a writing Fermentista and thank you if you trust my recommendations.

Hi, ich möchte gerne die Misopaste probieren. Ich scheitere aber schon beim Finden des richtigen Koji! Hast du vielleicht einen Link für mich?
Vielen Dank und liebe Grüße
Sabine
Liebe Sabine,
ich bestelle Reis Koji gerne bei fermentationculture.eu.
Dieses Jahr werde ich auch Koji selber herstellen – den Prozess schreibe ich dann zum Nachmachen auf.
Liebe Grüsse und viel Erfolg 🍀
Katsu
Hallo Katsu, du hast geschrieben, dass Du koji auch in einem Laden kaufst- in welchem Laden? Kannst Du mir den Namen sagen? Danke
Interessant, ich habe ein anderes Rezept gelesen, ganz ohne Holz und Gewichte, hast Du das schon mal ausprobiert? Grüsse
Hej Anne,
beim Fröhlichen Reisball in Hamburg bekommt man Gerstenkoji, wenn sie es denn gerade da haben. Ich würde vorher anrufen und fragen.
Ein Rezept ohne Gewichte kann ich mit nicht gut vorstellen, wer schreibt denn sowas? Das klingt für mich eher nach crossover als nach traditionellem Handwerk. Die Antwort ist jein: Ich habe es mal mit mehr und mal mit weniger Gewicht versucht, mit dem Ergebnis, dass weniger Gewicht ein weniger gutes Ergebnis lieferte. Auf das Holz kannst Du verzichten und Klarsichtfolie oder Backpapier nehmen. Auch Tuch soll da funktionieren, das habe ich aber noch nicht selber ausprobiert.
Gutes Gelingen mit Deinem Miso!
Katsu
Und wie wars?? Danke für Dein Teilen! Dieses Jahr werde ich mich ans Miso wagen 🙂 glaubst Du ich kann auch anderes Holz nehmen? Oder hat es einen Grund mit der Zeder? Und was passiert wenn die Flüssigkeit die Steine berührt? Vielleicht geht es wenn ich sie abkoche und mit Alkohol abreibe…Natursteine meine ich..
Hej Anne,
ich mache meinen Kojireis, oder Gerste oder andere Trägersubstanzen, jetzt nur noch selber. Es ist viel aromatischer! Funktioniert eigentlich ganz einfach, wenn man das Prinzip begriffen hat, ähnlich wie beim Miso.
Zedernholz hat Tradition, in Japan wurde und wird Miso in Zedernholzgefässen gereift. Es gammelt auch nicht trotz des langen Kontaktes mit dem feuchten Miso und Tamari. Ob Du anderes Holz nehmen kannst, weiss ich nicht, das musst Du ausprobieren.
Was passiert, wenn die Steine in Kontakt mit dem Miso kommen, kann man nicht pauschal beantworten. Ich vermeide es, weil ich die Zusammensetzung von Natursteinen nicht kennen kann und somit nicht weiss, welche Stoffe sich lösen könnten. Da hilft vorheriges Abreiben und Abkochen auch nicht. Unglasierte Keramik funktioniert aber.
Viel Erfolg!
Katsu
Hallo Katsu,
wie lange lässt du Kichererbsenmiso fermentieren? Vielen Dank im Voraus.
Liebe Grüsse Angelika
Liebe Angelika,
die Dauer der Fermentation richtet sich danach, mit welchem und mit wieviel Koji Du das Miso ansetzt. Wenn Du das Genmai-Miso aus diesem Rezept machen möchtest, kannst Du die Sojabohnen einfach 1:1 durch Kichererbsen ersetzen. Die Fermentationsdauer ist analog, also mindestens ein, besser noch zwei Jahre.
Best regards,
Katsu
Hi Katsu! Heißt das, dass man die Koji-Menge reduziert, wenn man dem Miso entsprechend mehr Zeit zum Fermentieren gibt? Danke schon mal im Voraus – deine Anleitung ist die mit Abstand beste, die ich online gefunden hab 🙂 Leider hab ich mir nur ein Pfund Koji-Reis bestellt und überlege jetzt, wie weit ich damit komme 😉
Liebe Jelena,
vielen Dank für das Kompliment, ich freue mich sehr, dass Dir meine Anleitung weiterhilft 🙂
Die Antwort auf Deine Frage ist ja. Helles, süßes Miso reift kürzer und braucht mehr Kōji. Das salzigere, dunklere Miso hat einen höheren Anteil an Hülsenfrüchten, braucht aber nur geringere Mengen von der Starterkultur Kōji.
Und ich bestell auch immer zu wenig Kōji… dieses Jahr probiere ich mal, Reis oder Gerste selber zu beimpfen.
Viel Spass mit Deinem Miso!
Liebe Grüsse, Katsu
Vielen Dank für seine Hilfe.
Liebe Grüsse Angelika
Hallo, ich will mich das erste mal an Miso herantrauen und habe Deine ausführliche Anleitung und Erklärung gefunden.
Wahnsinn wie Du die einzelnen Schritte einfach erklärt und bebildert hast! Großes Kompliment und danke dafür!
Da kann ja gar nichts schief gehen..
Liebe Grüße!
Vielen Dank für das tolle Kompliment ♥️ Ich wünsche Dir gutes Gelingen, die Misozeit kommt ja gerade um die Ecke.
Mir ist noch nicht ganz klar, ob ich die Gläser einfach zuschrauben, oder ob ich noch was Anderes machen muss, damit Fermentiertes oder auch die Misopaste über Monate haltbar wird.
Lieben Dank
Annalena
Liebe Annalena,
das kommt ein bisschen auf das Ferment an. Bei Miso brauchst Du keinen Deckel, das Gewicht und ein Tuch reicht. Gemüsefermente fermentieren anaerobisch, und solange kein Sauerstoff rankommt, sind sie haltbar. Mein längstes Gemüseferment stand 3 Jahre vor dem Verzehr. Viele Fragen beantworte ich bei den F.A.Q. und der Fehlersuche, ich empfehle Dir, Dich dort einzulesen.
Und wenn Du noch speziellere Fragen hast, frag gerne nochmal.
Gutes Gelingen!
Katsu
Moin,
am inneren Rand meines Misotontopf hat sich weißer und dunkler Schimmel gebildet.
Der miso ist mit Plastikfolie abgedeckt und Soyasoße hat sich gebildet. Dort kann ich keinen Schimmel entdecken.
Muss ich nun alles wegschmeißen?
Liebe Grüße
Moin Peter,
schwarzer Schimmel klingt nicht gut. Ich kann es natürlich aus der Ferne ohne Blick darauf nicht beurteilen, aber ich muss Dir zur Sicherheit raten, es zu entsorgen.
Ob Du Dich daran hältst, oder ob Du den Schimmel, der keinen Kontakt zum Miso hatte, mit Alkohol abreibst und nochmal Salz auf die Oberfläche streust, entscheidest natürlich Du. Für die eigene Gesundheit ist jede:r selber verantwortlich.
Versuche nächstes Mal, sauberer zu arbeiten und das Gefäss nach dem Befüllen bis zum Rand des Misos mit Alkohol abzuwischen.
Toi toi toi.
Katsu
Hallo Katsu, vielen Dank für die tolle Beschreibung. Ich hatte meinen ersten Versuch gleich mit einer ziemlich großen Menge Miso gemacht, und ich dachte ich hätte auch sauber gearbeitet, jedoch hatte ich nach einem Monat Schimmel oben drauf….. nicht schwarz aber es hat muffig gerochen. Ich war zu enttäuscht um alles wegzuwerfen und habe dann großzügig Miso abgetragen, alles mit Alkohol ausgerieben, das Miso nochmals durchgerührt und dicker Salz oben drauf gemacht. Jetzt nach weiteren 6 Wochen hat sich kein weiterer Schimmel gebildet und eine Flüssigkeit hat sich auf dem Miso gebildet. Es riecht jetzt auch richtig gut, also wie Miso halt riechen sollte, kein Schimmel/Muffel Geruch. Natürlich ist das keine Garantie, dass nicht doch irgendwo noch Schimmelsporen sind, aber das würde man ja dann bestimmt irgendwann bemerken, oder am Ende rausschmecken, oder?
Hej Volker,
Schimmelsporen können unsichtbar und vorallem unschmeckbar sein. Im Falle von Schimmel kann ich nur zum Entsorgen raten. Entscheiden muss dann jede_r für sich.
Ich wünsche dir mehr Erfolg beim nächsten Versuch!
Katsu
Griastie Katsu (Griastie ist Kärntnerisch (Österreich)und bedeutet Hallo,Servus usw….)
Ich hab da mal so eine Idee und Frage?
Habe mir 25 Kilo Soja besorgt und möchte daraus Misu machen,da ich ein paar alte Tiefkühltruhen habe,
kam mir die Idee darin Misu zu machen!
Soll ich einen Versuch starten?Was meinst du?
Dein Ratschlag wäre mir sehr wichtig!!
Danke und liebe Grüße aus Kärnten
Harald.
Hej Harald,
ausgeschaltete Tiefkühltruhen? Und welche Gewichte? Und wie verschliesst du es, damit es aerob fermentieren kann? Kühltruhen sind ja extrem dicht… Ich persönlich würde das nicht machen. Die Gefahr, dass es misslingt und es entsorgt werden musst, wäre mir zu gross. Und die Kosten für 25 kg Koji sind ja nicht gering.
Falls du dich trotzdem dazu entschließt, berichte gerne über den Verlauf.
Katsu
Hallo Katsu, danke für die hervorragende Beschreibung zum Herstellen von Miso. Ich möchte mich auch daran wagen und habe kleine Fragen. Wir wohnen in Düsseldorf und können hier einige Zutaten gut kaufen – was ich wissen möchte:
1. Bei Koji ist Kome Koji (=Reis Koji) gemeint? Das bezieht sich dann auch auf die Gewichtsangabe? Es ist ja ein großer Unterschied, ob das Trägermaterial Reis mitgezogen wird, oder nur die Koji Sporen. Letztere habe ich aber auch nie allein angeboten gesehen.
2. Als Gefäß zum Reifen habe ich einen wunderbaren Keramiktopf beim japanischen Händler hier gekauft. Allerdings ist er größer als ich gedacht hatte, faßt ca. 8 Liter. So ganz viel Miso möchte ich aber zu Beginn erstmal nicht machen. Zwei Kilo Sojabohnen habe ich, bei der Standardvariante würde ich dann 2 kg Reis Koji brauchen (Salz 12%) – richtig? Wäre diese Menge zu wenig für den großen Topf? Es bleibt dann ggfs viel Platz für Luftsauerstoff, der Schimmel würde eher wachsen? Hygienisches Arbeiten versteht sich – wurde ja gut beschrieben.
Danke fürs Feedback, freundliche Grüße Petra
Hej Petra,
ja, genau, mit Koji meine ich hier die auf dem Substrat gewachsenen Sporen, Kome Koji ist eine gute Wahl. Bohnen:Koji 1:1 ist richtig, ich würde aber mehr Salz benutzen, vor allem, wenn du es jetzt im Sommer ansetzen möchtest, 13-14% sollten es mindestens sein. Die Topfgrösse ist nicht so wichtig, wenn du die Oberfläche gut mit Salz bestreust und dann bedeckst, Zedernholz ist super, Backpapier funktioniert auch.
Und dann muss ja eh viel Gewicht drauf, da ist Platz ganz praktisch.
Gutes Gelingen!
Katsu